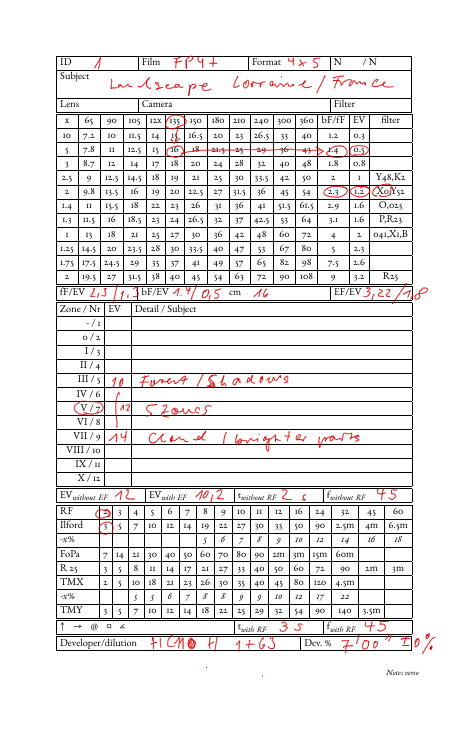
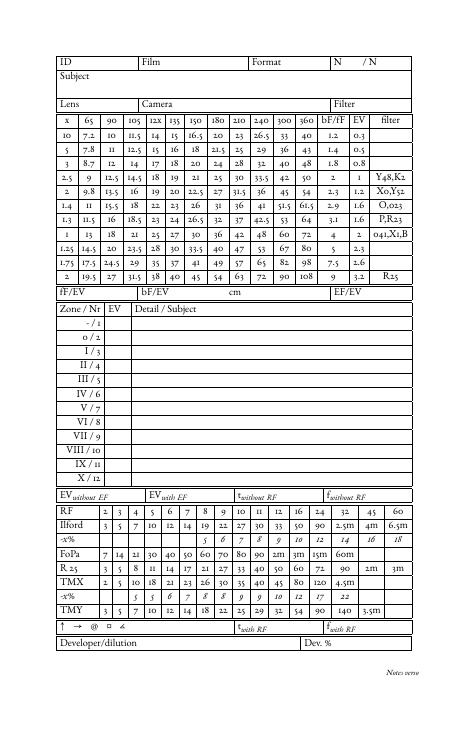
In the second block, we mark the focal length used in the first line e.g 135 mm. We then measure the distance from the focused lens to the film (average).
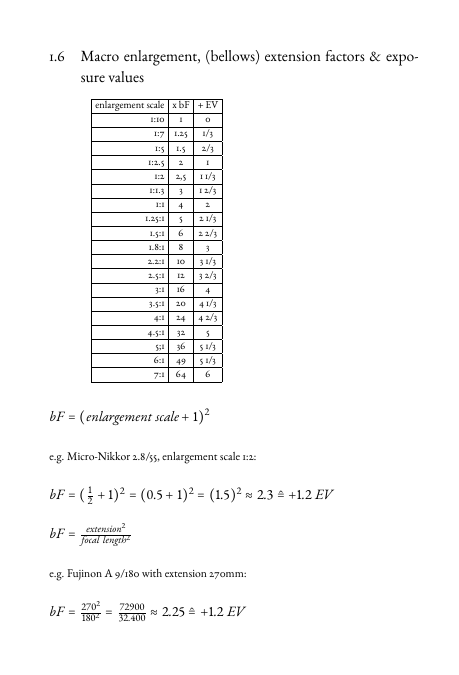
On the right side, we can see the bellows factor bF and the EV correction. Both values represent augmentations of exposure or aperture.
On the far right, we also see filter types. They are listed in the corresponding row next to the filter factors fF. We mark the correct values.
Overview of factors: fF/EV, bF/EV at x cm, total value EF/EV as the product of bF/fF, or sum of EV bellows and EV filter.
Sheet film / Zone System
In the next step comes previsualization in the zone system. We imagine the image as a finished print in our hand or on the wall. In the frame, in a passepartout or mat.
A zone is the average brightness of a contiguous area in the print hanging on the wall, as a mixture of different tone values e.g. the lower end of a tree trunk or a face or some clouds. Only structured and textured zones III through VII have full rendering: you can see every detail from the shadows in III to the highlights VII. II and VIII are semi-rendered, I and IX are so-called tone zones without visible rendering. - It's that easy, when we talk about silver gelatine prints ...
It is therefore important to consider what should be shown in zone III and VII. We measure with selective spot metering the shadows that should still have detail and note the EV as well as the designation for this detail. We do the same for the highlights in VII. We note the EV and the designation for these details.
With this two-point measurement, we can already control whether the EV for III and VII are exactly 5 zones, or more or less zones apart. This allows us to determine whether we want to increase contrast through N+1 development or reduce it through N-1 development: this is the zone system, and the reference section of the book also contains a table for this.
With this tool, our subject and negative tone values will fit within the range of the positive or photographic paper: we obtain fine, well-rendered prints, even at standard printing time (= printing time needed to bring the clear negative carrier into zone 0).
In the reference section of the book there is also a previsualization aid. Because, of course, the other zones can also be described. It always comes down to which detail of the subject should fall into which zone of the finished print.
Roll film / Exposure notes: The zone system is usually used with sheet film. With roll film, you cannot develop each image individually. The chart also has got about a dozen images per film (plus or minus). Instead of zone designations like 0, I, II ... IX, X, we use the numbers 1-12 and can thus note the average exposure as EV (e.g. incident light metering) and give each image a title.
In the next line, with sheet film, we first note the average EV measured with the light meter and then the EV calculated through EF (bellows factor, filter factor), from which the time and aperture can be read on the light meter.
For long exposures, the reciprocity factor must also be taken into account. We look up the measured exposure time in the first line of the next block and read the adjusted exposure time for the film used.
Finally, we note whether it is portrait or landscape format, cable release, tripod, adjustments. In the bottom right is the final exposure time and aperture. Below that is the developer and its dilution, as well as any adjustment to the development time. As you like it.
This all sounds complicated. But after two or three runs, you definitely get more routine, and then you are happy to be able to make very important decisions when taking the shot in a routine manner and always the same way. This system is developed from practical experience.
When you look at your negatives on the light table, you will immediately recognize from the notes what worked well and where you have got a measurement or setting error. Only with structure and comparability in the process do you have a chance to learn from your mistakes. That is what single-sheet processing is all about.
The exposure notes not only serve to make the photographer's work easier. They serve as an image documentation, too. On the back of the respective table, you can make free notes, create sketches, note things that belong to the image, such as addresses of people depicted, interested parties.
Furthermore, these notes demonstrate that you work carefully and systematically.
You show that you understand and master the zone system, and that it is part of your daily routine.
We prove that we actually photographed exactly as we intended to photograph, because the previzualisation is there.
We have strong arguments for selling our products at a fair price - one that matches our ambitions.
We demonstrate conscientiousness and professionalism.
Im zweiten Block markieren wir in der ersten Zeile die verwendete Brennweite. Dann messen wir den Abstand des fokussierten Objektivs zum Film (Durchschnittswert).
Auf der rechten Seite können wir den Balgenfaktor bF und die EV-Korrektur ablesen. Bei beiden Werten handelt es sich um Verlängerungen der Belichtungszeit bzw. um eine Öffnung der Blende.
Ganz rechts sehen wir auch noch Filtertypen. Sie stehen in der entsprechenden Zeile neben den Filterfaktoren fF ... Wir kringeln die richtigen Werte ein.
Übersicht Faktoren: fF/EV, bF/EV bei x cm, Gesamtwert EF/EV als Produkt von bF/fF oder Summe von EV Balgen und EV Filter.
Planfilm / Zonensystem
Im nächsten Schritt kommt die Prävisualisierung im Zonensystem an die Reihe. Wir stellen uns das Bild als fertigen Print in der Hand oder an der Wand vor. Im Rahmen, im Passepartout.
Eine Zone ist die Durchschnittshelligkeit eines zusammenhängenden Formbereiches im Print, der an der wand hängt. Nur die Zonen III bis VII haben volle Zeichnung: hier sieht man jedes Detail von den Schatten III zu den Lichtern VII.
Es ist also wichtig, sich zu überlegen, was in Zone III gezeigt werden soll. Wir messen mit selektiver Objektmessung die Schatten, die noch Zeichnung haben sollen und notieren den EV sowie die Bezeichnung für dieses Detail.
Dasselbe machen wir für die Lichter in VII. Wir notieren den EV und die Bezeichnung für diese Details.
Nun können wir mit dieser Zweipunktmessung bereits beurteilen, ob die EV für III und VII genau 5 Zonen oder 4 oder 6 Zonen auseinander liegen. Dadurch können wir sagen, ob wir den Kontrast durch eine N+1 Entwicklung verstärken oder durch eine N-1-Entwicklung reduzieren möchten: das ist das Zonensystem, und im Übersichtsteil des Buches findet sich auch hierzu eine Tabelle.
Mit diesem Hilfsmittel werden unsere Motiv- und Negativtonwerte auf den Kopierumfang des Positivs bzw. des Fotopapiers passen: feine, durchgezeichnete Prints!
Im Übersichtsteil des Buches gibt es noch eine Prävisualisierungshilfe. Natürlich lassen sich auch noch die anderen Zonen beschreiben. Immer geht es darum, welches Motivdetail in welche Zone des fertigen Prints fallen soll.
Rollfilm / Aufnahmenotiz: Zonensystem macht man meistens mit Planfilm. Bei Rollfilm kann man nicht jedes Bild einzeln entwickeln. Dafür hat es aber ein Dutzend Bilder pro Film (plusminus). Statt der Zonenbezeichnungen von o, I, II ... IX, X verwenden wir also die Zahlen von 1 - 12 und können so die durchschnittliche Belichtung als EV notieren und jedem Bild einen Titel geben.
In der nächsten Zeile notieren wir bei Planfilm zuerst den mit dem Belichtungsmesser gemessenen mittleren EV und dann den durch EF (Balgenfaktor, Filterfaktor) kalkulierten EV, aus dem sich dann Zeit und Blende ergeben, die man am Belichtungsmesser ablesen kann.
Bei Langzeitbelichtungen muss noch der Reziprozitätsfaktor berücksichtigt werden. Wir suchen in der ersten Zeile des nächsten Blocks die gemessene Belichtungszeit heraus und lesen die angepasste Belichtungszeit für den verwendeten Film ab.
Abschliessend notieren wir, ob Hoch- oder Querformat, Drahtauslöser, Stativ, Verstellung. Rechts unten steht die endgültige Belichtungszeit und Blende. darunter der Entwickler und seine Verdünnung, sowie eine eventuelle Entwicklungszeitanpassung.
Das alles hört sich kompliziert an. Aber nach zwei, drei Durchläufen wird man routinierter, und dann ist man glücklich darüber, sehr wichtige Entscheidungen bei der Aufnahme routiniert im immer gleichen Ablauf treffen zu können.
Versuchen Sie es selbst. Es ist einfacher, als Sie denken.
Schaut man sich die Negative auf dem Leuchtpult an, wird man anhand der Notizen direkt erkennen, was gut funktioniert hat und wo man einen Mess- oder Einstellfehler begangen hat. Nur mit Struktur und Vergleichbarkeit im Prozess hat man eine Chance, etwas aus seinen Fehlern zu lernen.
Die Aufnamenotizen dienen nicht nur dazu, die Arbeit des Fotografen zu erleichtern. Sie dienen auch als Bilddokumentation. Auf der Rückzeite der jeweiligen Tabelle kann man sich freie Notizen machen, Skizzen anlegen, Dinge notieren, die zum Bild gehören, z.B. Adressen von Abgebildeten, Interessenten usw.
Darüber hinaus dokumentieren diese Notizen, dass man sehr gewissenhaft mit System arbeitet.
Man zeigt, dass man das Zonensystem versteht und beherrscht.
Wir beweisen, dass wir tatsächlich exakt so fotografiert haben, wie wir es fotografieren wollten.
Wir haben somit sehr wertvolle Argumente für einen fairen Verkaufspreis unserer Prints.
Wir zeigen Gewissenhaftigkeit und Seriosität.
Deswegen enthält das Buch auch wertvolle Hinweise zur Makrofotografie mit externem Belichtungsmesser: weil man das Licht unter Kontrolle hat, und weil man mit einer sehr kleinteiligen Spotmessung nicht weiter kommt. Wer mit der Grossformatkamera Makroaufnahmen machen möchte, wird sowohl mit der Distanztabelle der Aufnahmenotizen gut bedient sein, also auch mit der Übersichtsseite zur Makrofotografie.
Inhaltlich Verantwortlicher: Dr. Werner Brück, Muristrasse 42, CH-3006 Bern, wer@fotografie.ist - Mißbräuchliche bzw. unerlaubte Verwendung untersagt. Keine Haftung für Korrektheit bzw. inhaltliche Richtigkeit von Artikeln bzw. Hyperlinks.

 zum Selbstversuch →
 zum Selbstversuch →